• Category Archives Tutorials
  • Party Time


    It’s my turn to host the Inspiration Challenge on Splitcoast (IC900) & I chose a really fun site w/ lots of ideas..The Refab Diaries & their Pinterest Board where I found THIS picture. I thought the bright colors & hodgepodge of items would be perfect for the image I wanted to use.

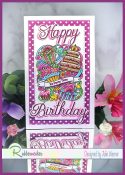
    After stamping & coloring this party image, I fussy cut it (actually pretty easy since it’s just a rounded outline). I popped it up just a bit on a mini slimline bg & backed it w/ a piece of polka dot paper. The banner was stamped separately, fussy cut & popped up on the original banner area. For this greeting & the large Happy & Birthday words, I used a combo of Versaclair Glamorous & Purple Delight, stamping one then the other on top of it,  to get the right color to match the paper (the Misti is essential for this). After I die the words, I used the leftover part as a reverse mask & stenciled in the pinkish shadow.

    You can see the finished Happy at the top & the reverse mask/stencil of Birthday at the bottom.

    Here the stenciling/sponging is finished.

    I placed the stamped, die cut words slightly offset to allow the shadow to show behind them.


    Here are the Copics I used for the image:

    Thanks so much for stopping by!


    Supplies:

    Stamps: Rubbernecker Stamps: Birthday Magic set, Happy Birthday Lg/Sm set
    Paper:  Staples 110# white,  dp (Rubbernecker Stamps:  It’s Party Time paper pad)
    Ink: Memento tuxedo black, Versaclair Glamorous & Purple Delight, Rubbernecker Stamps:  Color Fuse set #5
    Accessories:  Rubbernecker Stamps:  Birthday Magic set, Birthday Magic Lg/Sm set, Stitched Mini Slimline, dies,  Copic markers, Crossover II, Misti


    You might also like:


  • Spring Gardening


    It’s my turn to host the Splitcoast Featured Stamper Challenge (FS789) and a big congrats to Colleen! She has such a fun, colorful gallery & I chose THIS card to case. I kept the layout & spring theme, but used different dies & colors & made mine a gardening instead of Mother’s Day.

    For my card, I die cut all the pieces..the umbrella, the rain boots, flowers, fence & grass out of a mix of solid & printed papers then assembled them all. The watering can was cut out of a stone colored, textured paint chip & I added a little detail w/ grey & white Prismacolor pencils. I also used a lt grey pencil to shade the fence so it would stand out a bit more. I added a strip of flower print paper down the left then attached all my die cuts.

    I have few extra pics showing how I elevated the umbrella. I’ve tried several different ways but this seems to work the best for me.

    First, I used a narrow strip of card stock, folded each end in on itself & added a drop of glue & stuck it down to make each end a little sturdier. Then I fan folded the middle section as you see above.

    Another drop of glue was added to the backside of the top umbrella piece & I stuck down one end of the zigzag spring & held it w/ tweezers until it set. (The small piece of the flower print was just an extra from when I cut it so I stuck it to the back side of the umbrella to make it sturdier.)

    Then I added glue to the edges of the umbrella & the other end of the zigzag spring.

    I used a pair of tweezers to hold the ends until they set, then added a dot of glue at the center of the umbrella & held it until it set. So the umbrella top is attached all along the upper edge, but the zigzag spring props up the bottom center of the umbrella. This zigzag spring will allow the umbrella to flatten a bit inside an envelope but is sturdy enough to pop back up when taken out.

    Thanks so much for stopping by!


    Supplies:


    Stamps: Rubbernecker Stamps: Kittie Says Spring
    Paper:  Staples 110# white, stone paint chip, textured yellow, dp (Echo Park- Spring Fling)
    Ink:  Memento tuxedo black
    Accessories:  Rubbernecker Stamps: Umbrella, Mini Slimline Stitch, Rain Boots, Watering Cans, Hanging Flowers, Tulips, Grass #2, Tabbed Grass, Picket Fence dies,  Misti, Crossover II


  • Birthday Again


    It’s my turn to host the Splitcoast Inspiration Challenge (IC848), & we’re visiting a site called Desire to Inspire & their Pinterest Board where I found THIS to inspire my card.

    For my card, I started by generously swiping the 2 Distress inks across piece of white card stock.  I first coated the entire piece w/ the raspberry, then came in w/ the violet from the bottom. It was heat set to dry the heavy ink application. The Rose Bg Strip image was stamped on top of the color w/ Versamark & heat embossed w/ clear powder. The embossing was to keep the color under the images, as is. I placed this panel, face up on the bottom plate of my embossing machine, spritzed it w/ water, then placed a blank white piece of c/s on top. Then I placed the top plate on it & ran it thru the machine. The first time I did this, the color went all over my bottom plate so the next time, I put it all inside a folded piece of copy paper.

    Here is what the process looks like. First pic is before the image was heat embossed onto the inked bg.

    Second pic is after misting & running thru the die cut machine w/ a blank piece of c/s on top. The color is lighter on the original (right side) because it transferred to the blank piece. The color stayed dark under the clear embossing & this embossing left the negative (white) image on the piece on the left. I’ll save this one for another project.

    The two flowers were stamped, colored w/ Copics & die cut w/ their coordinating dies. I used a new label die for the greeting & added some gold rhinestones to the flower centers.

    These are the Copics I used for the flowers:

    Thanks 
    so much for stopping by! 


    Supplies:

    Stamps: : Rubbernecker Stamps: Bird/Rose Bg Strip, Always on My Mind
    Paper:  Staples 110# white
    Ink:  Distress inks picked raspberry & wilted violet, Versamark
    Accessories:  Rubbernecker Stamps:  Always on My Mind,Inside Scallop Frame, Outside Scallop Frame, Small Tags dies,  Crossover II, Misti, gems, clear embossing powder

    Â