Posts Tagged ‘paper pierce’
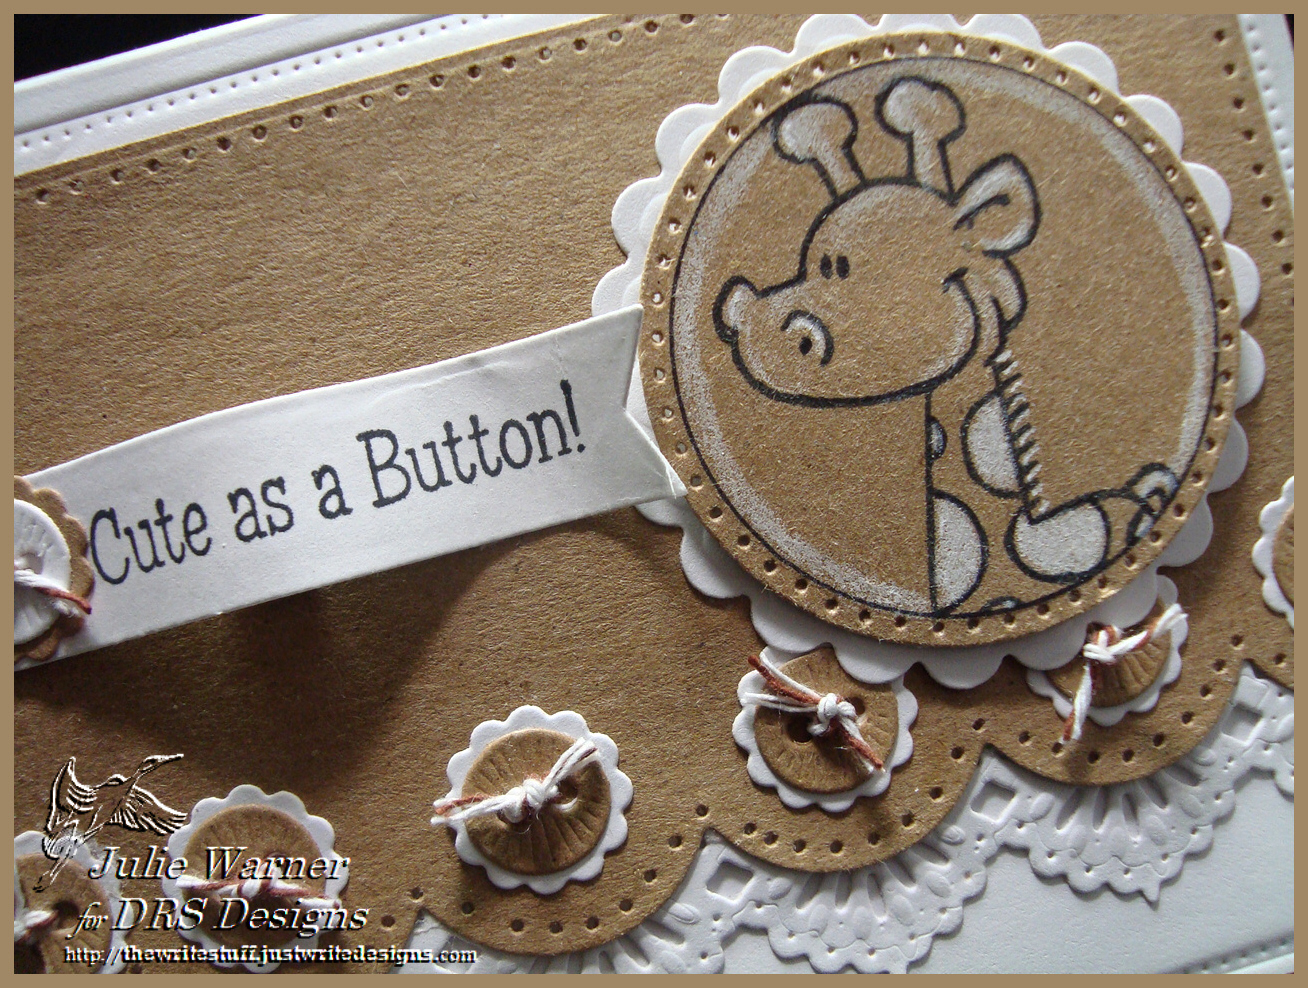
A big congrats to Becky, the newest Featured Stamper on Splitcoast (FS421)! She has a fun, colorful gallery and it was hard to pick, but I kept coming back to THIS card. I even started out to use a horse silhouette, but mine was a bit too small so I changed it to a baby giraffe & then changed the stars to buttons. I also changed it to a baby card & added some die cut lace & piercing.
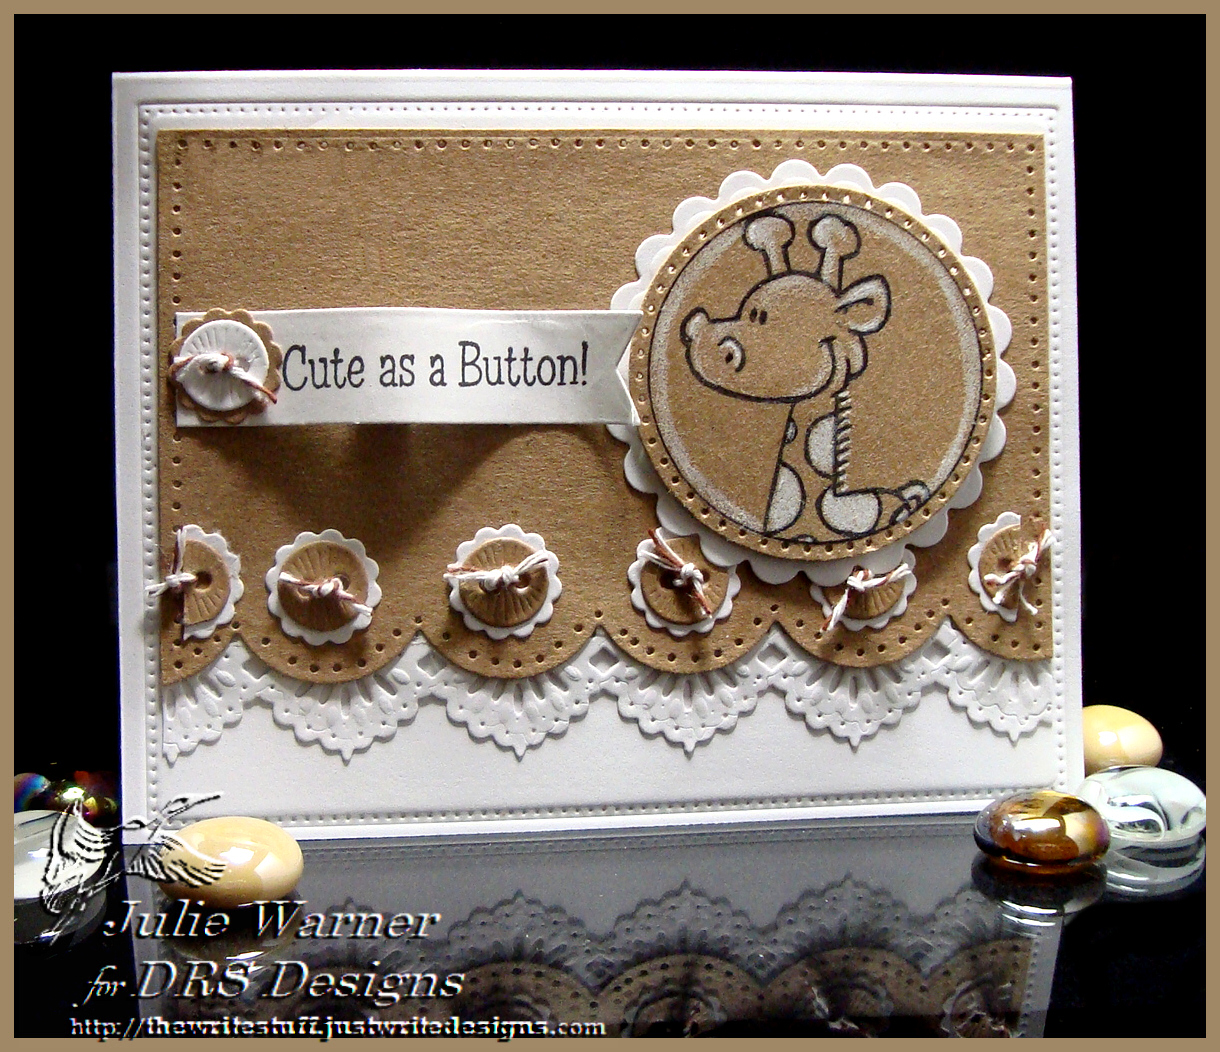
My card is pretty simple…mostly die cuts. The baby giraffe was stamped on kraft & I added just a bit of shading with a white Prismacolor pencil. The inside edge of the circle die was traced w/ a black Sharpie then I used the same die to cut it, added some piercing & added a white scallop circle die cut behind it. The large kraft panel was die cut across the bottom w/ a scallop die then more piercing all around. The white crochet lace was also die cut & added beneath it. I used a border piercing die to just emboss the front of the white card. Some kraft & white buttons were die cut, twine tied through them & added in the scallops.
Congrats again, Becky! Thanks so much for stopping by!
Supplies:
Stamps: DRS Designs – Jenny Giraffe, Cute as a Button Greeting |
Paper: Neenah white, kraft |
Ink: Memento tuxedo black |
Accessories: white Prismacolor pencil, Spellbinders A2 matting basics B, circle & scallop circle dies, ODBD Flourished Star Pattern (embossed card front), Matting circles (buttons)& Beautiful Borders (crochet lace) dies, fishtail banner dies (MFT), baker’s twine, piercing tool & mat, Lifestyle/Quickutz scallop border dies |
Welcome to Our Daily Bread designs May release! We have some gorgeous images and dies for you this month! And they coordinate so well with the release from last month!
First, the prize details:
- Three winners will be randomly chosen from the comments left on the designers blogs to receive a $15 Gift Certificate to the ODBD Store, to be used toward the purchase of ODBD Stamps.
- You have until May 2, 2014 at 9:00 p.m. EDT to leave your comments!
- The Winners will be posted on the ODBD Blog on May 3rd, so be sure to check back there to see if you won!
For my first card, I combined the new Vintage Labels dies & Carried to Heaven with the Flourish Label Borders, Vintage Flourish Pattern dies, Ornamental Cross Collection dies & Chalkboard Vine Background from last month’s release. I also added the Cala Lily from the Loving Memories set. After I die cut the Vintage Labels and the Vintage Flourish Pattern dies out of white, I left the dies in place on the labels and stamped the Chalkboard Vine pattern on top using the sky blue ink. I added the Flourish Label Border on the largest die using the black ink.
The lilies were colored with Copics and fussy cut. I added a bit of blue to the smallest cross and stacked the crosses on top of the lilies. The finished card is 5.50 x 4.25 and these are the Copics I used.
Stamps: Our Daily Bread designs – Carried to Heaven, Loving Memories, Chalkboard Vine Background, Flourish Label Borders |
Paper: X-press it white, lt blue |
Ink: Memento tuxedo black, Memories sky blue |
Accessories: ODBD Ornamental Cross Collection dies, ODBD Vintage Labels dies, ODBD Vintage Flourish Pattern dies, Copic markers |
For my second card, I used the Sheltering Angel, the Chalkboard Vine Background, the Vintage Label Dies, the largest of the Vintage Flourish Pattern die and the Angel Wings dies. I liked the lt blue ink on white on my first card, so I made a large background again using the Chalkboard Vine Bg and the sky blue ink. I thought it needed a little something, so I pierced all around the border. The Sheltering Angel blessing was stamped, die cut and with the die still in place, I used colors from the two Kaleidacolor pads to sponge the color on top. For the yellow label and the largest background, I stamped the Chalkboard Vine bg again using the straw ink (stamped one off) and sponged on a little more of the same ink to deepen the color. The Angel Wings were die cut out of yellow and I used the yellow & orange inks from the melon Kpad to add a little more color.
Supplies
Stamps: Our Daily Bread designs – Sheltering Angel, Chalkboard Vine Background |
Paper: X-press it white, yellow |
Ink: Memento tuxedo black, Memories sky blue, Kaliedacolor melon melody, blue breeze, Distress ink scattered straw |
Accessories: ODBD Vintage Labels dies, ODBD Vintage Flourish Pattern dies, ODBD Angel Wings dies, sequins. paper piercer |
Thanks so much for stopping by! Please be sure to visit all of the DT Blogs for much more inspiration!
Chris * Grace * Cathy * Julie * Stacy * Dawn * Sandee *
Lori * Sabrina * Lisa * Angie * Wanda * Audrey
Today, we are reviewing the ODBD November release. Aren’t these ornament images and dies lovely? So perfect for all your Christmas cards and so easy to customize with whatever colors and papers you want to use. For my ornament, I stamped it w/ the concord ink and added color w/ Copic markers. The greeting was stamped on a strip of the same snowflake paper (from the ODBD Christmas Paper Collection), added a hint of color before attaching it across the ornament w/ a couple of purple mini brads. For the snowflake paper layer, I used a French curve ruler and a craft knife to cut the curvy borders. After piercing along the edges, I added a bunch of graduating sizes of circles. These were die cut and although I didn’t use the actual die cut, I liked all the little rounded dots.
The snowflake paper was attached on top of another piece of designer paper. On this dp, I enhanced the lt blue areas w/ a Copic marker. After everything was attached, I added some stickles to the dots and also the centers of the snowflakes on the ornament.
Thanks so much for stopping by!
Stamps: Our Daily Bread designs – Christmas Pattern Ornaments |
Paper: Neenah white, soft sky, ODBD Christmas Paper Collection 2013, other dp |
Ink: Distress Ink dusty concord |
Accessories: ODBD Circle Ornament dies, Spellbinders Asian accents die (under ornament topper), fading dot border die (for all the little purple dots), Copic markers, stickles, French curve ruler, piercing tool & mat, brads |