• ODBD Happy Birthday, Kelley!


    We all hope you have the best birthday ever, Kelley! So to start  you on your way, the Breadsticks put this little hop together for you.

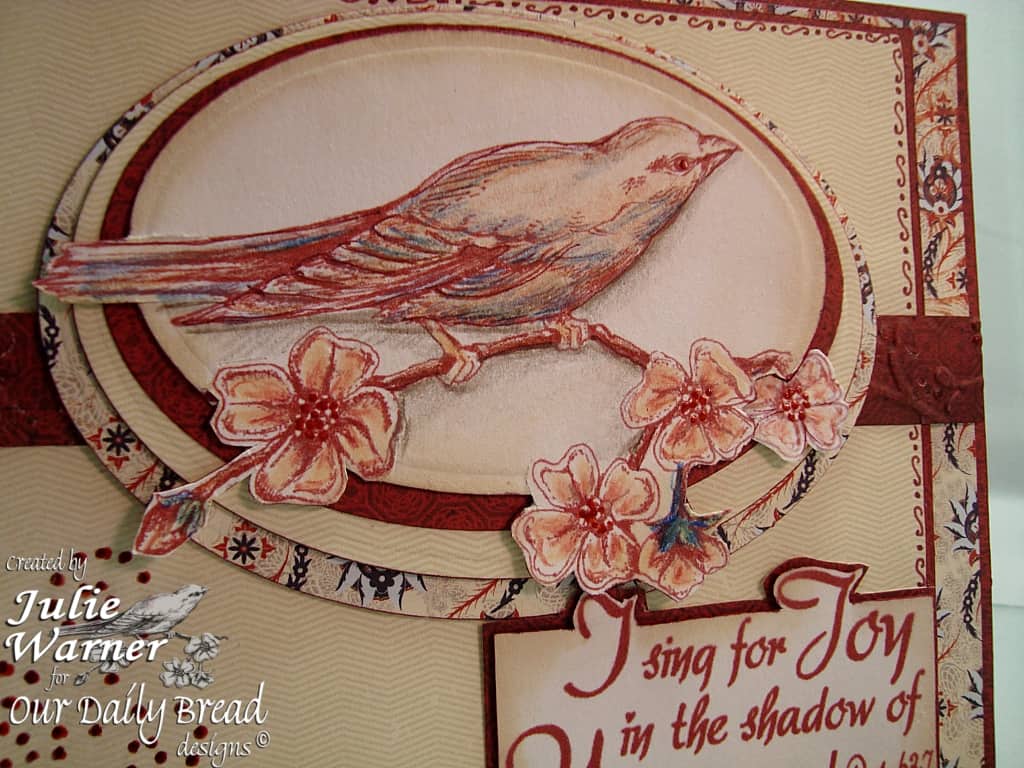
    I’m using images from  ODBD’s Sing to the Lord set. The bird, sentiment and one extra flower were all stamped in dk red. I used Prismacolor pencils to add some color and before you start wondering, I have no idea what kind of sparrow this is supposed to be.  I just colored him to go with my dp, lol. Oval Nesties and the out of the box Nestie technique was used for the bird image. Graduated sizes of ovals were used for the additional layers (I used both the Large Petite ovals and the Small Petite ovals to get these sizes) and I layered them offset toward the top of the ovals. All the ovals are backed with some thin chipboard to give them added dimension. A little soft sand ink was sponged around the edges of the image oval.

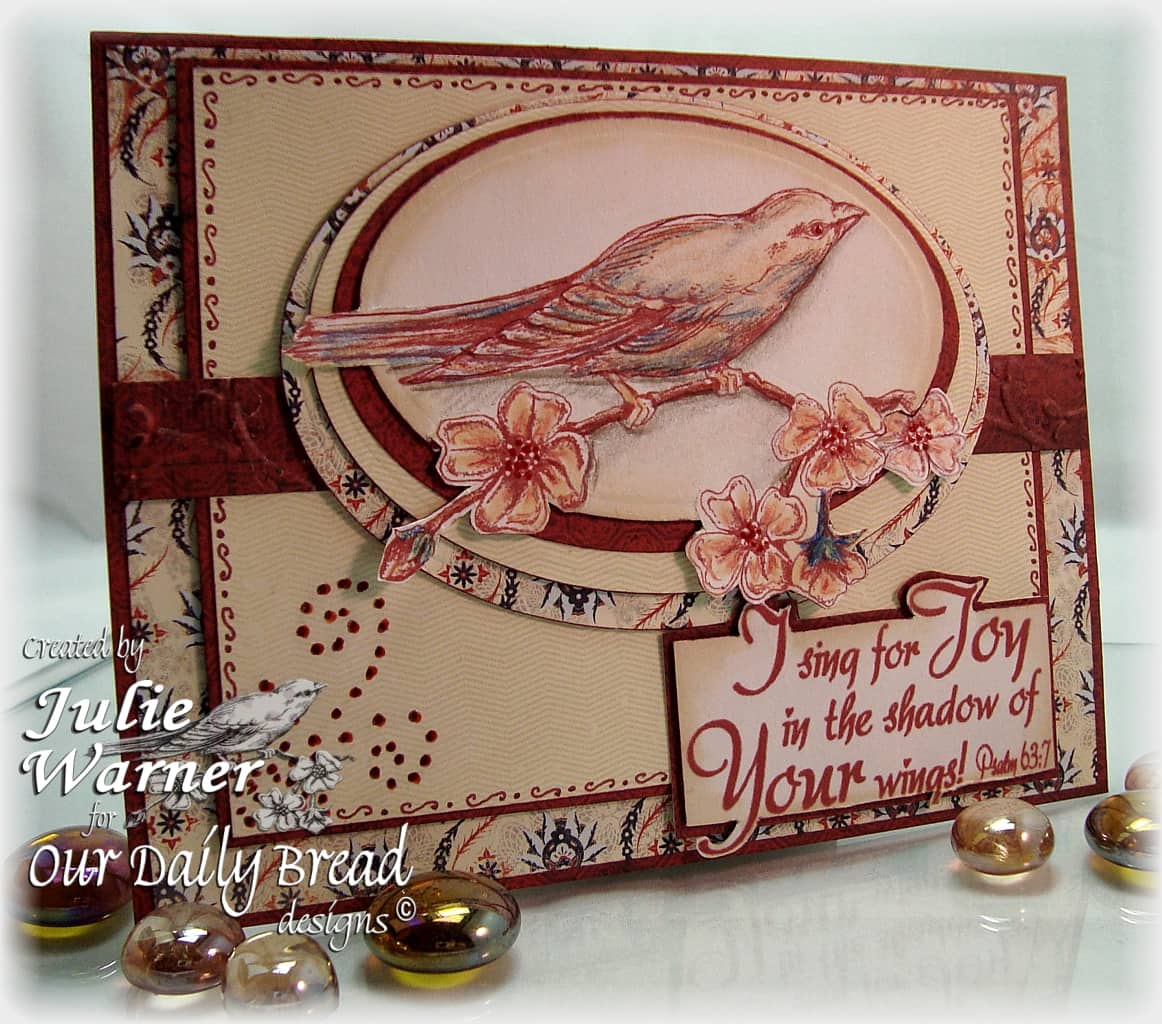
    On the soft yellowish print layer, I added some doodling with a burgundy Micron pen. On the burgundy band, I used a branch border folder to emboss it. The sentiment was cut out of the box as well and attached to a burgundy layer.

    Please continue on our little Birthday Hop by clicking on the following links:

    Chris Olsen
    Sabrina Jackson
    Marcelle Schauer


    Thanks so much for stopping by!


    Supplies:
    stamps: ODBD- Sing to the Lord
    paper: white, dp (all are Basic Grey from the Boxer6x6 pad)
    ink: Ancient Page bordeaux, Memories soft sand
    accessories: Prismacolor pencils, Spellbinders oval Nesties sets, Cuttlebug border folder (Just My Type), burgundy Micron pen


  • ODBD Oct Release Blog Hop!

    Julie Warner - justwritedesigns https://thewritestuff.justwritedesigns.com/

    Welcome to Our Daily Bread designs’ October Release Blog Hop!

    Julie Warner - justwritedesigns https://thewritestuff.justwritedesigns.com/Weekly-Favorite
    BEST OF 2010

    For my card, I used the new Randi’s Song set. I love the leaf block and beautiful script. I had some left over background from long ago projects and the colors just said Fall to me. I stamped the leaf block image 6 times onto an alcohol ink background (polished stone technique) and cut out three of the leaves to pop them up on the base image.  On the marigold layer, I stamped the script multiple times with the gold ink. I also stamped the shadow leaf with gold ink and the leaf veins using a Kpad. It’s attached to another background I call Gilded Rainbow (here’s the tutorial for this technique). The dk redwood brown layer was cut with deckle scissors and all layers were edged with a gold leafing pen. I wrapped some gold thread around the brown layer then attached it to a 8.5 x 4 (fits a #9 business envelope) card. The card was also marigold in color, but since I couldn’t find just the right color of rich paprika, I sponged it with color until I liked it.

    Julie Warner - justwritedesigns https://thewritestuff.justwritedesigns.com/

    Thanks so much for stopping by!


    Supplies:
    stamps: ODBD – Randi’s Song
    paper: marigold, redwood brown, alcohol ink background & gilded rainbow background
    ink: Kaleidacolor Autumn Leaves, Brilliance Galaxy Gold, Ancient Page coal
    accessories: deckle edge scissors, Krylon gold leafing pen, gold thread


  • Gilded Rainbow Tutorial

    Julie Warner - justwritedesigns https://thewritestuff.justwritedesigns.com/

    Click on any picture to enlarge.

    Supplies Needed:


    Step One:

    Brayer the entire piece of paper using the rainbow ink pad.

    Julie Warner - justwritedesigns https://thewritestuff.justwritedesigns.com/

    Step Two:

    Crumple the piece of brayered paper into a ball.

    Julie Warner - justwritedesigns https://thewritestuff.justwritedesigns.com/

    Step Three:

    Flatten out the paper and ink the creases using the direct to paper (DTP) technique. I’m using Tea Dye Distress ink.

    Julie Warner - justwritedesigns https://thewritestuff.justwritedesigns.com/

    Step Four:

    Crumple the paper once again, flatten out and ink the creases with a darker ink. I’m using Ancient Page Sienna ink. Repeat steps 3 & 4 with a different ink color. I’m using the Distress Fired Brick ink.

    Julie Warner - justwritedesigns https://thewritestuff.justwritedesigns.com/

    Step Five: (Optional)

    I wanted to tone the color down a little, so I used the Soft Wheat ink all over the paper.

    Julie Warner - justwritedesigns https://thewritestuff.justwritedesigns.com/

    Step Six:

    Crumple the paper a final time, smooth out and ink the creases with the metallic gold pigment ink. I‘m using the Encore Ultimate Metallic Gold ink.

    Julie Warner - justwritedesigns https://thewritestuff.justwritedesigns.com/

    Step Seven:

    Sprinkle on the embossing powder. Do not cover the entire paper. I used a little measuring spoon to drop the powder here and there. Tap off the excess and return to the jar. Heat the powder until melted and until any non coated areas are dry.

    Julie Warner - justwritedesigns https://thewritestuff.justwritedesigns.com/

    Step Eight:

    Enjoy your finished background! Here’s a card example using a piece of this finished background. I used it for a backing layer for some color behind the leaves on the marigold panel.

    Julie Warner - justwritedesigns https://thewritestuff.justwritedesigns.com/

    Julie Warner - justwritedesigns https://thewritestuff.justwritedesigns.com/