• Category Archives Masking-Reverse Masking
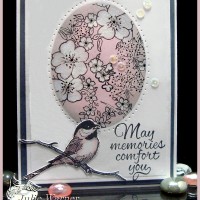
  • Floral Oval Sympathy

    Floral Oval Sympathy cu 06107
    Weekly-Favorite CAS-FavoriteBest of 2015 SCS
    Today’s Technique Challenge (TLC528) on Splitcoast is Cluster Stamping and involves die cutting or punching a large mask then stamping inside with smaller images. I die cut an oval out of a card sized piece of copy paper where I wanted it to be on the actual card. After placing this reverse mask on top of the actual piece of card, I sponged pink ink inside and a little gray around the edges.
    Floral Oval Sympathy 06108
    Leaving the mask in place, I stamped the different flower images, then using a tiny acrylic paintbrush, I painted bleach on the flowers to remove most of the color. I also went over it a bit with a white Prismacolor pencil to smooth out the white areas. After removing the mask, I used a pierced oval around it. The greeting was stamped (using a stamp positioner to move the lines closer together) in the lower right and a fussy cut little bird was added on the left along w/ a few clear sequins. These are the Copics I used for the bird.
    Floral Oval Sympathy copics 06104
    I started w/ the RV colors then thought the pink was a little too much on the cool side to go w/ the sponged pink so I added just a touch of the cherry white to warm it up. Here’s a look at the inside.
    Floral Oval Sympathy inside 06111
    Thanks so much for stopping by!
    Julie2 sig
    Supplies:

    Stamps: DRS Designs –Dandelion Puff, Dogwood Branch, 4 Flower Background, Bird on Branch, May Memories Sympathy, Deepest Sympathy (inside)
    Ink: Memento tuxedo black,  Distress inks spun sugar, weathered wood
    Paper: Neenah white, sparkle dk gray heather
    Accessories:  Spellbinders A2 matting basics A & B, oval & pierced oval dies, bleach, small acrylic paintbrush, white Prismacolor pencil, clear sequins

  • ODBD April Release!

    Rain Showers cu 05995
    Weekly-Favorite
    Welcome to the Our Daily Bread designs April Release! We have some fabulous images & dies for you this month!

    Prize Information: – 

    Three randomly selected winners will each receive a $25 gift certificate to the ODBD Store, to be used toward the purchase of ODBD Stamps found in the “stamps column” of the website just for commenting on the Design Team cards!  You have until April 2, 2015 at 9:00 p.m. EDT to leave your comments on the Designers Blogs for a chance to win!  The Winners will be posted on the ODBD Blog on April 3rd, so be sure to check back there to see if you won!

    Rain Showers 05990
    For my first card, I made a background on water color paper using Distress Inks, a water spritzer & a teflon craft sheet. I smooshed one ink color onto the mat, spritzed,  then lightly pressed the paper to it. After drying the one color, I wiped off the mat and proceeded to the next color. I used 3 harmonious colors in all & the reason I did it one at a time & dried in between was to layer the colors and not have them all run together. I like the way the background reminds me of a rainy day, but with happier colors. I die cut it and used the outermost die from the Flourished Star Pattern die to cut the pierced layer behind it. The umbrella & umbrella topper were die cut from 4 colors of card stock & the Happy die was cut from 2 of the colors and stacked, offset. I used it to replace the Happy in the greeting & used a stamp positioner to rearrange the rest of the wording.

    The finished card is 4.25 x 5.50 & here’s a look at the inside:
    Rain Showers inside 05998

     Supplies:

    Stamps: Our Daily Bread designs – April Showers, Showers of Blessings
    Paper: white, water color, lt blue, cobalt blue, lt green, aqua
    Ink:  Memento tuxedo black, Distress Inks evergreen bough, tumbled glass, broken china
    Accessories: ODBD Flourished Star PatternHappy Birthday, Clouds & Raindrops, Umbrellas, Layered Lacey Squares diesSpellbinders A2 matting basics A&B dies, SAMJ, teflon craft sheet

    See the Stars cu 06004
    Weekly-Favorite
    My second card also started with water color paper, but this time I used actual water colors on it along w/ some metallic gold & white acrylic paints.
    See the Stars 06002
    When I saw this greeting in the How Great Thou Art set, I kept picturing a swirling galaxy of stars so that was the look I was trying to achieve. I wanted to splatter some masking fluid on the background first, but found mine had totally dried up. So I watered down a little white acrylic paint & splattered it first & after it dried I did several water color washes using different shades of blue. After drying it w/ my heat gun, I splattered a little more white & a little gold on top & used a small paint brush to add some swaths of gold here & there. I used a metallic brushed gold card stock to die cut the Vintage Flourish frame & also the stars. The greeting was heat embossed & die cut in a circle to add on top of the large star. Here’s a different view showing how shimmery it all looks w/ the gold highlights.
    See the Stars xcu06017
    And the inside of the card:
    See the Stars inside 06013
    Supplies:

    Stamps: Our Daily Bread designs – How Great Thou Art
    Paper: water color, metallic brushed gold
    Ink:  Versacolor midnight pigment ink, Memento blue danube (inside)
    Accessories: ODBD Vintage Flourish Pattern, Sparkling StarsLayered Lacey Squares (inside) dies, Spellbinders A2 matting basics A&B & circle dies, water colors, Cobalt Tapestry embossing powder, white & metallic gold acrylic paint

    Please be sure to visit & comment on all the DT blogs for your chance to win!

    Julie * Sandee * Cathy * Dawn * Lori *

     Angie * Chris * Grace *Silke * Wanda * 

     Thanks so much for stopping by!
    Julie2 sig


  • Birthday Vase

    Bday Vase cu06069
    Weekly-Favorite Best of 2015 SCS
    Today’s Color Challenge (CC524) on Splitcoast had some pretty colors…perfect for flowers, which was also one of the dessert options. I have this new little dandelion image and I thought it would look good in a vase. After stamping & masking, I sponged the 3 closest colors I had to the challenge and spritzed w/ a little water. I added a few white dots w/ a gel pen just to brighten them up a bit then I cut them out.
    Bday Vase 06068
    After I die cut the flower heart, I sponged the same colors on the flowers, spritzed them then put it back in the die & embossed it again while damp. This is really thick card stock and it embosses so much better when damp. After I punched the vase, I also misted it and embossed it w/ the same die. The edge of the lighter pink c/s was punched, sponged a little & white dots added to the centers. When the card was all put together, I added the black Candi dot on the flag & a little Wink of Stella on the dandelions.

    Since I didn’t use any designer paper, I repeated the dandelions & sponging on the inside.
    Bday Vase inside 06073
    Thanks so much for stopping by!
    Julie2 sig
    Supplies: 

    Stamps: DRS Designs –Dandelion Puff, Happy Birthday, Rest of Life Greeting (inside)
    Ink: Memento tuxedo black, Kaliedacolor baby powder (yellow), Distress inks worn lipstick & dried marigold
    Paper: Neenah white, pink, strawberry
    Accessories:  Spellbinders A2 matting basics A die, MFT fishtail flag die, Memory Box Vernay Heart die, Punch Bunch vase punch, white gel pen, Wink of Stella pen, Candi dot, Martha Stewart hydrangea border punch