• Category Archives Christmas/Holiday/Winter
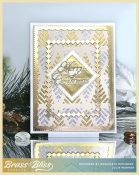
  • Christmas Bicycle Postcard


    A Christmas card reminiscent of vintage postcards, using understated grey & white w/ splash of red, here & there. Easy to make & easy to mail since it’s one layer.

    A big congrats to DonnaJeanne, the newest Featured Stamper (FS877)! She has a marvelous gallery & I chose THIS card to case. I kept the muted grey & white w/ a splash of red colors & the 2 wheeler, but I used different images & dies, a bicycle instead of a motorcycle & made mine a Christmas card.

    After stamping & die cutting the bicycle, poinsettia, holly & bow, I stamped the snowflakes & postcard border using light grey ink. The paper came w/ this distressed look & I thought it worked well for my vintage postcard look. I also inked the edges just a bit w/ the same grey ink. For the greeting & other postcard writing, I stamped it first w/ black ink then over stamped w/ red to give it the burgundy color. I added a die cut little cardinal on the bicycle seat. I added another die cut bicycle under the original to give it a little dimension & sturdiness.

    Here are the Copics I used:

    Thanks
    so much for stopping by!


    Supplies:

    Stamps: Rubbernecker Stamps: Vintage Postcard set, Happy Birthday set (bicycle), Peekaboo Snowman set (poinsettia & holly), Christmas Cheer Gnomes set (greeting & snowflakes)
     Paper:  Staples 110# white, red, distressed white/grey
    Ink: Memento tuxedo black, Versaclair glamorous, Rubbernecker Stamps: Color Fuse ink set #12
    Accessories:  Rubbernecker Stamps:  Stitched Rectangles, Happy Birthday set, Peekaboo Snowman set, Christmas Cheer Gnomes set dies,  MISTI, Copic markers


    You might also like:


  • Be Merry


    A fun, glittery holiday card with plenty of silver sparkle embossing and glitter paper. So bright and sparkling for a Christmas greeting or a holiday party invite. 

    For the Inspiration Challenge (IC938) we are visiting PepperLu & their Pinterest Board where I found THIS picture to inspire me. 

    The little boy in the picture became a sparkling wine glass on my card. I die cut it out of silver glitter paper & the wine out of red glitter. The black layers were backed w/ the same silver glitter paper. I used a silver tinsel embossing powder to heat emboss the upper part of the large black panel w/ the stars & dots. The greeting was also embossed w/ the same powder. I put two greetings together, using the first line of one & adding the Merry from another under it. Some red & clear gems were sprinkled throughout the top.

    Since the first line of the greeting was from a longer greeting, I masked off the lower section. I’ve been asked how I do this & I took a pic to show you the easiest way I’ve found to do this. After inking the part I want to stamp, I put a strip of scotch tape across the part I want to exclude. I do this because I’ve found no matter how well I think I’ve wiped the ink off that part, it is never quite all, so this just ensures I don’t have any unintended inking.

    Thanks so much for
    stopping by!


    Supplies:

    Stamps: Rubbernecker Stamps:  Build a Phrase Holiday set, Winter’s Night (stars & dots), Spooktacular Coffee set (partial greeting)
    Paper:  Staples 110# white, black, DCWV silver & red glitter
    Ink: Encore ultimate metallic silver
    Accessories:  Rubbernecker Stamps: Stitched Rectangles, Outside Scallop Frames, Wine Glass & Bottle, Santa w/ Presents (Santa hat) dies, Crossover II,  Ranger silver tinsel embossing powder, rhinestones


    You might also like:


  • Christmas Wreath


    An easy to make Christmas Wreath card featuring a large stamped wreath which is colored in using a 4 part stencil. There is also a matching die to cut it out, making it a really quick project. You can make a stack of these in almost no time at all.


    It’s my turn to host the Featured Stamper Challenge, so a big congrats to Lisa! She has a marvelous gallery & I chose THIS card to case. I kept the layout but used different images, dies & colors and made mine a Christmas card.

    My large wreath was stamped & the colors were sponged in using a 4 pt stencil & some Color Fuse inks. There is a matching die for this, but I already had the 2 circles cut & decided to use them instead. I put the greeting on the smaller one & popped it up on top of the wreath & added some little red rhinestones.

    I had the dk red strip but it was a little too long, so I cut it first w/ a mini slimline layer then used the pierced cover die on it before attaching my circles on top.

    Thanks so much for stopping by!


    Supplies:

    Stamps: Rubbernecker Stamps: Winter Wreath set
     Paper: Staples 110# white,  dk red, dp (Rubbernecker Stamps: Off the Grid paper pad)
    Ink: Memento tuxedo black, Rubbernecker Stamps: Color Fuse ink set #4, set #10
    Accessories:  Rubbernecker Stamps:  Mini Slimline Stitch, Winter Wreath set, Stitched Rectangles, Stitched Circles, Background Cover #1 dies, MISTI, Crossover II, Rhinestones


    You might also like: