Welcome to the Our Daily Bread designs October Release! We have some gorgeous Christmas images, dies & paper for you this month!
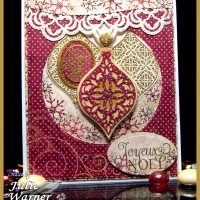
 For my first card, I gold embossed the two background ornaments & die cut w/ the matching dies. The left ornament also has a gold embossed Flourished Alphabet letter J. The top ornament was die cut w/ the other topper die out of the same paper as the main layer. I used the largest Matting Circle die to cut the center & since the snowflake paper only has the flakes around the border, I arranged the circle opening near one corner so it would look like the flakes are circling the bottom. I used more of the snowflake paper for the gold embossed greeting & Leafy Edged Border topper. A Candi dot was added on top of the center ornament & coated w/ gold stickles & I also added some Wink of Stella on the metallic gold c/s behind the top ornament.Here’s a look at the inside.
 Supplies:
Stamps: ODBD -Christmas Tunes, Elegant Embellishment set, Flourished Alphabet
|
Paper: vanilla, pale gold metallic, dp (ODBD – Christmas Collection 2015)
|
Ink: Encore Ulitmate metallic gold pigment
|
| Accessories: ODBD Elegant Embellishments, Ovals, Flourished Star Pattern, Leafy Edged Border, Vintage Flourish Pattern, Vintage Label dies, Spellbinders A2 matting basics A & B dies, detail gold embossing powder, gold Wink of Stella pen, gold Stickles, Candi dot |

My second card will have you singing Christmas Tunes! I’ve been humming them ever since I started this card. I just love a cream & gold Christmas card with lots of gold embossing, so that’s what I’ve done here.
 After gold embossing the Christmas Tune, it was die cut w/ the matching Vintage Label die & the brushed gold metallic backing layer was die cut using a die from the Vintage Flourish Pattern die set. The largest gold layer was die cut with the Flourished Star Pattern largest die. The top background was a little trickier since it’s 3 layers & the top 2 are divided in 3. I first cut the cream layer, divided it but pushed the layers together to gold emboss the different Snowflakes on top & cut the bottom using the Leafy Edged Border die. I attached 3 gold layers behind them & carefully lined up the bottom & cut again. The largest faintly patterned dp layer was cut to match the bottom curve.
 I used a different Leafy Edge Border to cut the cream colored border running under the greeting then stacked the gold embossed Snowflakes in the lower right. The top 2 snowflakes were fussy cut & each flake is elevated just a little from the one underneath. So it has a bit of dimension but is still, definitely mailable.
Here’s a look at the inside with more stamping & some leftover pieces from the front die cuts.
 Supplies:
| Stamps: ODBD – Christmas Tunes, Sparkling Snowflakes |
Paper: ivory, brushed gold metallic, dp (Anna Griffin)
|
Ink: Encore Ulitmate metallic gold pigment (Brilliance gold & Versafine sepia on inside)
|
| Accessories: ODBD Snowflakes, Flourished Star Pattern, Leafy Edged Border, Vintage Flourish Pattern, Vintage Label dies, Spellbinders A2 matting basics A & B, detail gold embossing powder |
Please be sure to visit & comment on all the DT Blogs! It will be much appreciated & definitely increase your chance of winning!
Sandee * Julie * Cathy * Amy * Dawn * Lori *
Robin T. * Lisa * Angie * Chris * Grace *
Sabrina * Silke * America * Loretta * Robin C.
Thanks so much for stopping by!