This is a Christmas card for the reader in your family or group of friends. This set has several book themed images & greetings, perfect for the avid reader. The background has a little…
- Category Archives Stencils
-
-
 Snowy Night Scene
This is an easy, very clean and simple card to help get you a jump on the Chrismtas season. The entire white front is one die cut. Cut it, add some paper behind it and you are done! Change…
-
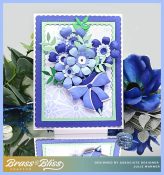 Blue Flowers
Today I have flowery card in shades of blue. It’s not hard to make, just one die for all of the flowers and leaves cut out of coordinating blues and a couple of greens. The background…