This tutorial came about after an ongoing discussion with Roxie at SCS about our methods of doing the Out of the Box Nestie Technique. We each were using this technique, we just went about it differently. I promised I would take some pictures to show my method. (Click on any image to enlarge.)
For Step 1, I stamped my image(s) and selected the Nestie shapes I might want to use. I selected the sizes of the circle and rectangle that were slightly smaller than my image in order to get the Out of the Box look I want. Usually, I just cut this frame out of white copy paper, but I’m using a light blue in order to be more visible here.
For Step 2, place the frame around the image and lightly trace the frame with a pencil.
In Step 3, I use a craft knife to cut the areas which will be Out of the Box. In order to insert the Nestie die under this area, I have to start the cut inside the circle. I cut very close to the image outline and continue around the image to other side.
The Out of the Box area is cut. Note that the very top is just a rough cut for now. I don’t want it to be too unstable when I insert the Nestie die. I will go back and finish trimming this area with detail scissors after I’ve cut and embossed the Nestie circle.
In Step 4, I insert the die under the Out of the Box area I’ve cut out. With the die under this area, it will not be cut or embossed. Test fit your die before cutting to make sure you have cut your image deep enough to allow the die to be inserted on your pencil lines.
Now I will remove the die and finishing trimming the top area.
My Out of the Box is ready for coloring. It doesn’t really matter if you color your image before or after. I have done it both ways. With this method, it has worked the first time for me and I haven’t had to do it over. If my Out of the Box area has a lot of cutting inside the shape, I will usually add a little scotch tape to the back after it’s cut and embossed. This just stabilizes the area and really makes the cut disappear.
I’m including this picture to show you my detail scissors. Quite a few people have commented on my detail cutting so I wanted to include this. The little orange pair of scissors have small, curved blades. You can see they are only about 4″ in length but the small curved tips make cutting a breeze. I’ve done a lot of decoupage and these scissors are invaluable. Fiskars made these, but cuticle scissors work, too. Another trick is to remember to turn the paper, not the scissors, when you are cutting.
All done! This was colored with Prismacolor Pencils and OMS (odorless mineral spirits, aka Gamsol).
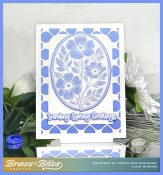
Thanks for looking and I hope you try this fun technique. Here’s the finished card I made with this fun image.
“If they give you ruled paper, write the other way.”


February 20th, 2009 - 11:31 am
thanks again, Julie for your excellent pic showing just how you did this. Since I love to cut and trim things, I will definitely be using this. And I adore your card with the fab IO mug…the diamonds turned on their side is a great visual!
Happy Weekend
February 22nd, 2009 - 7:43 pm
This is absolutely gorgeous! Wonderful coloring!
February 24th, 2009 - 1:03 am
What a great tutorial!! Looks pretty easy now that I see it done…I’ll have to give this a try!! Fabulous card – love the fruity colors!
April 3rd, 2009 - 12:14 am
WOW! You are a genious! Love this and will have to try it on my own!! Hugs,
April 23rd, 2009 - 8:19 pm
yes! genius!! I love it!! tfs!!!
April 24th, 2009 - 1:30 am
Awesome! So easy too! Thanks, Julie!
April 30th, 2009 - 1:28 am
Thanks for the great pics and tutorial. You’re brillant!
April 30th, 2009 - 7:16 am
Wow thank you for this turtoial. I WILL have to try this. I woundered how you got it so nice looking. Thanks. Diana
May 17th, 2009 - 2:14 pm
This is a MUCH better way to do this than I do, which is to run it half way through my Cuttlebug, hoping I don’t go too far and cut part of the image, which is what usually happens! It works about 50% of the time……yeh…..not so good! lol!
May 18th, 2009 - 2:50 am
I love your tutorial, but I don’t have Nesties, so I tried it with my cricut. You can see my take on it, on my Blog
Thanks for the tutorial
x
Rima
June 24th, 2009 - 6:37 pm
Are you kidding?! Wowsa, that is so cool. Plus I actually have that stamp. Looks like I’ll be casing another one of your inspirational ideas. Plus I just love the colors. Super job!
Cheryl
July 13th, 2009 - 8:48 am
[...] w/ markers and a water brush. I cut it out using the Out of the Box Nestie technique (tutorial Here.) It’s attached to a piece of navy dp. The green layer was stamped w/ a canvas bg image and [...]
July 13th, 2009 - 7:37 pm
What a great technique. Thanks so much for sharing with the rest of us. I love to stamp, and have been stamping off and on for quite a few years, but I still consider myself a novice. I appreciate all of the help fellow stampers are willing to give with their vast creativity and knowledge. Thanks again. I love this technique and your card!
July 13th, 2009 - 8:47 pm
Fabulous instructions Julie. I’ll have to try that technique. Thanks for all the details. Your are SO good at that and the visual is a lifesaver!!
July 27th, 2009 - 1:03 pm
This is a great tutorial. Thank you so much for showing all of us.
July 27th, 2009 - 9:56 pm
Thank you; the pictures help tremendously – LOVE the bright card!!!
July 31st, 2009 - 1:06 pm
pure geniuus!..and a lovely and beautiful card!
TFS!
July 31st, 2009 - 1:59 pm
This is a super tutorial. Your card is fabulous. TFS!
September 3rd, 2009 - 8:06 am
[...] The heron (SZ) circle was stamped on white c/s and cut w/ a Spellbinders Nestie circle, using the Out of the Box Nestie Tech. I used markers to add just a touch of color. The larger outer circle was also cut w/ a Nestie [...]
October 5th, 2009 - 3:12 am
This is so cool! I hadn’t thought to do it this way but I’m ready to go give it a try. Thanks for sharing your technique and especially for taking the trouble to photograph it.
October 18th, 2009 - 8:25 am
Great tutorial! thanks!
October 19th, 2009 - 4:01 pm
[...] into the moon area. It was cut w/ a Spellbinders oval Nestie and a technique I came up with called Out of the Box Nestie. A little color was added w/ markers and after I edged it w/ the markers, I used a water brush [...]
October 20th, 2009 - 9:14 am
[...] w/ a comvinations of markers and Prismacolor pencils. I cut him out using a technique I call Out of the Box Nestie using Spellbinders labels 2 dies. I added some color around the edge w/ markers and attached it [...]
November 1st, 2009 - 12:53 am
Thank you for the wonderful tutorial. Your card is beautiful.
November 18th, 2009 - 1:22 am
This is a FABULOUS tutorial. Thank you!! Going to have to tryit out
Your card using it is wonderful.
November 19th, 2009 - 11:26 pm
[...] technique challenge TLC247 (out of the box). I love this technique and use it a lot. I even did a tutorial back in Feb. for it using the Spellbinders [...]
November 23rd, 2009 - 1:29 am
[...] of white c/s, colored them w/ markers then added some Twinkling H2O’s on top. I used the Out of the Box Nestie Tech to cut out the pine cone. The edges were sponged then I cut around the top part of the pine cone [...]
January 31st, 2010 - 2:36 pm
[...] of sparrow this is supposed to be. I just colored him to go with my dp, lol. Oval Nesties and the out of the box Nestie technique was used for the bird image. Graduated sizes of ovals were used for the additional layers (I used [...]