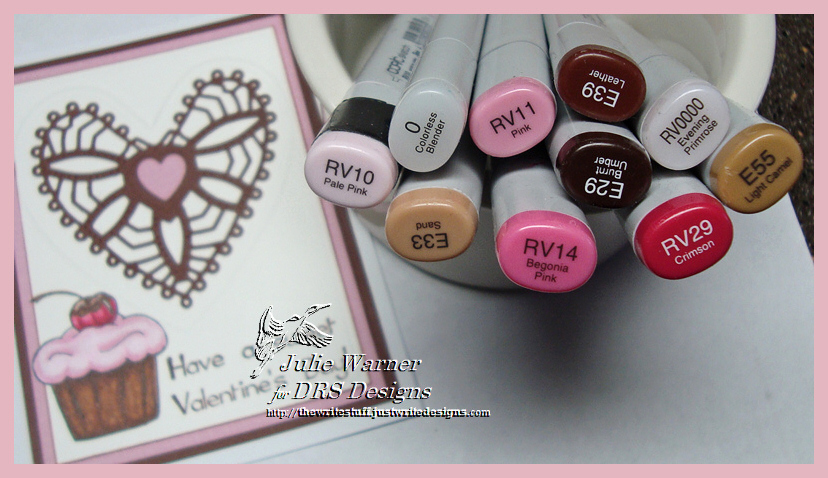
• Tag Archives Copic
  • North Coast Creations December Release!

    NCC Caution Party cu 05253
    Welcome to the North Coast Creations December Release! We have some really fun images for you this month! Perfect for that birthday boy (young or old) on your list.

    Prize Information:

    Just for commenting on the Design Team Blog Posts, you have a chance to win a $10 NCC Gift Certificate, good towards the purchase of NCC Stamps.  You have until December 17, 2014 at 10:00 PM EST to leave a comments on the participating designers blogs for a chance to win! Two random winners will be selected from the comments left on the designers blogs, the winners will be announced on the NCC Blog on December 18, 2014, be sure to check back there to see if you have won!

    NCC Caution Party 05251
    On my first card, I used the fun Dump Truck Birthday set. After coloring and die cutting the truck, I added a green border with a marker. The Caution strip was stamped in green on the yellow dp across the bottom and an extra piece was cut out to “tape” across the truck panel. The other piece of dp was cut w/ a curved die and bordered w/ a narrow strip of dk green. The finished card is 5.50 x 4.25 and these are the Copics I used.
    NCC Caution Party copics 05240
    Supplies:

    Stamps:  North Coast Creations –Dump Truck Birthday
    Paper:  white, dk green, dp (Basic Grey – Wander)
    Ink:  Memento tuxedo black, cottage ivy
    Accessories: Spellbinders A2 matting basics A & B, curved border dies, Copic markers

    NCC I Dig You cu 05260
    On my second card, I used the super cute I Dig You set. Again, I stamped, colored & die cut the image. I added a couple of mats behind it then a larger background of chocolate & white polka dot paper.
    NCC I Dig you 05258
    I used the large frame die from the ODBD Flourished Star Pattern dies to emboss the front of my white card before I added the other layers & image. The greeting tag was die cut with one of the ODBD Mini Tag dies and tied w/ some baker’s twine. The finished card is 5.50 x 4.25 and these are the Copics I used.
    NCC I Dig You copics 05243
    Supplies:

    Stamps:  North Coast Creations –I Dig You
    Paper:  white, map dp (Paper Studio -Uncharted), chocolate/white polka dot (Pebbles -Welcome Christmas)
    Ink:  Memento tuxedo black, rich cocoa
    Accessories: ODBD Flourished Star Pattern & Mini Tag dies, Spellbinders A2 matting basics A & B, Copic markers, Candi dot, baker’s twine

    Please be sure to visit & comment on all the DT blogs to make sure you’re entered to win!

    Lori * Julie * Lisa * Dawn * Amber * Sandee * Angie

    Thanks so much for stopping by!
    Julie2 sig


  • All Us Reindeer

    All Us Reindeer 05049
    Weekly-Favorite
    For  Lee’s VSN Challenge (VSNDEC14N) on Splitcoast, I made this fun Christmas card. Aren’t these reindeer cute? it seems a perfect time for them to load up on their magic grain. We don’t want them to fall out of the sky on their Christmas eve ride!  I stamped the middle one, masked him then stamped the other two beside him. I knew I wanted to make him into Rudolph so I put him out front. After coloring them & the background, I stamped the snow bg using sky blue ink. The Merry Christmaswas stamped in red and I cut an arced banner & attached two fussy cut holly bunches on either side. I used a stamp-a-ma-jig to place the From All greeting and made the two lines a bit closer together then colored in the letters. A single holly berry was stamped & fussy cut to make Rudolph’s nose then I added a little red stickles to it and star dust stickles to the magic grain.

    The finished card is 5.50 x 4.25 and these are the Copics I used.

    All Us Reindeer copics 05041
    Thanks so much for stopping by! If you haven’t yet, be sure to check out the DRS Thursday Challenge. This week, Sing it to Me! Add stamped music or sheet music or be inspired by a song. DRS image are not required!
    Julie2 sig

    Supplies:

    Stamps: DRS Designs- Feeding Reindeer, Snow Background, Merry Christmas Arc, Triple Holly, From All Greeting
    Paper:  X-Press It white, Christmas green
    Ink: Memento tuxedo black, love letter, Memories sky blue
    Accessories: Copic markers, stickles, Spellbinders A2 matting basics A & B, red permapaque marker

  • Ornaments 2 Ways

    Ornament WC cu 05097
    Weekly-Favorite
    Best of 2014!
    For today’s Inspiration Challenge on Splitcoast (IC470), I chose THIS for my first card and THIS for my second. I’m actually using the same ornament image on both, just different techniques and I actually had to do “surgery” on my ornament image. I wanted a blank ornament but all I could find was this ornament which originally had a nativity scene inside, so I took a craft knife and carefully cut it out. On this triple ornament card, I saw a card Lydia posted on the SCS FB page of some free form water color ornaments and really liked it. I don’t remember who did it or how long ago it was, or I’d link it.

    Ornament WC 05091
    So after the image surgery, I stamped the ornament, masked & stamped twice more using pumice ink (after stamping off once) onto water color paper. This w/c paper isn’t my fave..it’s a little rougher & grainer than what I usually use, but I couldn’t remember where I put the other paper. Anyway, the pumice ink after stamping off 1 time, just leaves a bare outline that pretty much disappears when all the coloring is finished. Now the coloring took me a quite a while because the color has to be painted in layers & allowed to dry in between. I’m not one to appreciate watching paint dry, so I helped it a lot w/ a heat gun. The splotchy, free form look is intended to be that way & I’m pretty satisfied with it. 

    I added a little splatter & went back w/ a fine line paint brush to remove some paint for the highlights along the edges then stamped the greeting & drew the lines to the ornament tops. The finished card is 4.25 x 5.50. 

    Red Ornament 05167
    Weekly-Favorite
    For this card, I stamped the same surgically enhanced ornament w/ the black ink & colored with Copics. The stars were stamped on top and I used a white gel pen to fill the large one in then fussy cut it. The pine branches were stamped w/ the evergreen ink then I die cut the panel w/ one of the matting basics rectangles. I took a curved border die and cut off the bottom & attached the two parts on top of a  background I made a while back using distress inks, spritzing & w/c paper. I added another little curved border strip on top of the bottom section & stamped half of a greeting under it (the other half is on the inside).  A die cut red bow was added on top & these are the Copics I used.

    Red Ornament copcis05101
    Thanks so much for stopping by!
    Julie2 sig
    Supplies:

    Stamps: DRS Designs- (1. Triple Ornament card) Nativity Ornament, Beautiful Holiday Greeting (2. Red Ornament card) Nativity Ornament, Pine Bough, Lovely Gifts Christmas Greeting, Retro Starburst, 3 Wisemen Peace (for small star)
    Paper:  1. water color, red linen,  2. X-Press It, water color, red
    Ink: 1. Distress Ink pumice stone, Versafine onyx  2. Memento tuxedo black, Distress Ink evergreen bough, worn lipstick, spun sugar, pistachio, tumbled glass
    Accessories:  1. tube water colors, #10 round brush, #0 liner brush, Copic markers, Spellbinders A2 matting basics A & B    2.  Copic markers, Spellbinders A2 matting basics A & B, curved dies, white gel pen, Cheery Lynn Pretty Pretty Bows die

    Â