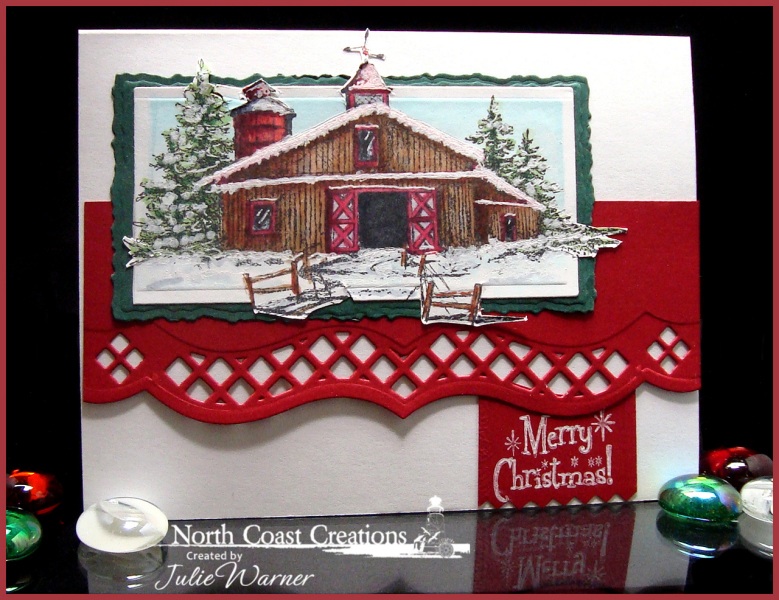
• Tag Archives Christmas
  • ODBD Dec Release Blog Hop

    Julie Warner - justwritedesigns https://thewritestuff.justwritedesigns.com/Welcome to the December Our Daily Bread designs Release Blog Hop!

    If you came from Becca’s Blog, you are in the right place, but if you just happened on my blog you should go to the ODBD Blog and start from there, and if along the way any links are broken simply return to the ODBD blog where the entire list will be listed in order. Now on to my project!….. Click any picture to enlarge

    Julie Warner - justwritedesigns - https://thewritestuff.justwritedesigns.com

    I’m using the smaller of the two beautiful ornament images on the new Ornaments set. You’ll notice that these ornaments fit perfectly inside the Spellbinders Heirloom Ornament dies! That’s because Spellbinders chose ODBD as a Preferred Stamp Partner!  What does that mean? ODBD will be expanding their lines to include perfect match sentiments, Scriptures and images to Spellbinders dies. Pretty exciting!

    My ornament was gold embossed three times on vanilla card stock in order to layer the center of the ornament.  It was colored with markers and a water brush, the base ornament was die cut with the Spellbinders die and the other two centers were layered on top. The dk green/gold dot dp was cut with a Labels 10 die and all layers were edged with a gold leafing pen. The sentiment was also gold embossed and hand cut. A sheer ivory bow was added on top of the ornament. The finished card measures 4.25 x 5.50.

    Julie Warner - justwritedesigns https://thewritestuff.justwritedesigns.com/
    

    I hope you enjoyed my project today! From here, hop on over to Kathy’s blog for some more inspiration!

    Thanks so much for stopping by!


    Supplies:
    stamps: ODBD – Ornaments
    paper: vanilla, dp (all from The Paper Studio)
    ink: Encore Ultimate Metallic Gold
    accessories: gold embossing powder, Krylon gold leafing pen, sheer ivory ribbon, Spellbinders Heirloom Ornament & Labels 10 dies


  • Blessed Christmas

    Julie Warner - justwritedesigns - https://thewritestuff.justwritedesigns.com
    Weekly-Favorite

    Congrats to Kris, the Featured Stamper today on Splitcoast! Love her gallery and I’ve had my eye on Merry Christmas for a little while. I kept the great layout and Christmas theme, but changed the images, color and embossing folder.

    All images are Our Daily Bread designs. On the image rectangle, I embossed the greeting and stamped a portion of the snowflake bg. I embossed a lg snowflake and some smaller ones. The ODBD snowflake die was used on the lg flake and I used a sm punch for the smaller ones. I used a MS snowflake border punch down one side of the cobalt layer. I didn’t have any blue ribbon, so I used the stonewashed ink to dye my white satin ribbon to match. After using the ultramarine marker around the edges, I also embossed them w/ the same ep.
    Julie Warner - justwritedesigns - https://thewritestuff.justwritedesigns.com
    For the lg bg, I used a Sizzix embossing folder and edge the panel w/ an ultramarine marker. The finished card measures 5.5 x 4.25.

    Thanks so much for stopping by!

    Julie2 sig
    Supplies:
    stamps: ODBD – Peace & Joy, Snowflake Swirl Bg, Mistletoe Tag
    paper: Neenah white
    ink: Versacolor indigo, Adirondack stonewashed
    accessories: Sizziz Christmas 2 embossing folder, ODBD snowflake die, Stardust embossing powder, ribbon, snowflake punch (Marvy), Martha Stewart snowflake border punch, Tombow ultramarine marker


  • DDIC40 & ISC Nov Day 2


    Julie Warner - justwritedesigns - https://thewritestuff.justwritedesigns.com

    Welcome to the Divine Diva Inspiration Challenge! Today our picture comes from The Perfect Remedy. Since this is also a release day for ISC, I have two projects to show. I’m using all ISC images for both, so combining the posts works out really well.


    For my first one, I’m using Marvels of Nature III for the tree and greeting images, and Christmas Trinkets for the building and background image. Out of the box is one of my fave techniques and I’m really enjoying the reverse (sort of into the box) of it. The principal is the same it’s just what you cut that is different. For this, I first stamped the tree with the green and brown inks and added highlights with a marker. I traced the Spellbinders long rectangle around the tree and cut around the part of the tree that was inside the rectangle. Then I  cut the rectangle the same way I do in the out of the box method. The building image was stamped first with green ink, then overstamped with the honey ink.  I used a smaller rectangle to die cut it. The green background was stamped with a medallion image from the Christmas set.  Finished card measures 5.5 x 4.25.

    Julie Warner - justwritedesigns - https://thewritestuff.justwritedesigns.com
    Supplies:
    stamps: ISC – Marvels of Nature III & Christmas Trinkets
    paper: white, moss, mustard
    ink: Ancient Page pine green & chocolate, Distress Ink wild honey
    accessories: Tombow gold ocher marker, Spellbinders long rectangle set, Quickutz rectangle set

    Please be sure to stop by and visit the rest of the Diva team. I know they’ll have some wonderful creations for you!

    • Lori (chanteuse)
    • Chris (glowbug) (taking this week off)
    • Anne (jdmommy)
    • Donna (donnarie)
    • Julie (justwritedesigns) you are here!


    For my second project, the ISC team was challenged to make a gift card holder. I have a purse/notecard pattern I drew about 5 years ago and thought with a little alteration, it would make a nice holder for a gift card.  If you would like the pattern, please click for my free PDF file. Asymetrical Flap Purse pattern instructions The pattern will print out in the actual size. (Click any of the pictures to enlarge.)

    Julie Warner - justwritedesigns - https://thewritestuff.justwritedesigns.com

    For the outside of my purse/holder, I stamped it with a  distressed background image and a combo of the red inks. The flap liner was stamped with a combo of the green ink. Both were edged w/ markers. The holly images were colored w/ makers and cut out. I used a small Velcro circle (cut in half) for the closure.

    Julie Warner - justwritedesigns - https://thewritestuff.justwritedesigns.com
    I used all of the pattern pieces except for the side gussets. These were left out in order for the purse to open completely. The gift card holder insert was attached to the bottom section but could just as easily be attached to the top.  I used a Basic Grey notch tool to cut the half circle tabs but you could easily cut these w/ a kraft knife or use a slot punch. The small card with the greeting is not attached as you can see in the picture below.
    Julie Warner - justwritedesigns - https://thewritestuff.justwritedesigns.com
    Supplies:
    stamps: ISC – Christmas Trinkets, Christmas Elements, Holidays,  Dimensional Elements Edges #1
    paper: white
    ink: Brilliance rocket red, rocket red gold, gamma green, pearlescent ivy
    accessories: Tombow markers, Basic Grey notch tool,  narrow ribbon, 1/8 inch hole punch (to insert ribbon handle), stickles, Velcro dot

    Thanks so much for stopping by!
    Julie2 sig