• Category Archives Thank You
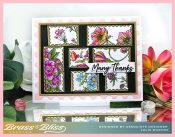
  • Rose Border Thanks


    An easy to make Thank You card for someone special. The rose die cut border on top is beautiful over what ever color you want to use. The greeting is half die cut, half stamped, but you can stamp the entire wording, if you prefer.

    A big congrats to Giovana, the newest Featured Stamper (FS886)! She has a gorgeous gallery & after much window shopping, I chose THIS card to case. I kept the multicolor design, but where she used a stencil I made a stripe background on glossy paper using dye reinkers & a baby wipe. Her white space is the stencil, mine is the die cut on top. I also kept the “everything” part but made mine a thank you card & added more white space for the bottom of my card.

    My card was pretty easy to make. The baby wipe (tutorial HERE) bg had been in my stash for a while so I die cut the rose border, added some white cardboard under it for strength, then attached it to the stripe background. The lower section that was cut off from the border was added back on, but I shifted it just a tad down. The very lower edge was trimmed off about 1/2″ so I could add a narrow strip of the background at the bottom.

    The Thanks die cut was stacked for dimension & the rest of the greeting was stamped underneath it.

    Thanks so much for stopping by!


    Supplies:

    Stamps: Brass & Bliss: Freehand Frame set
     Paper:  Staples 110# white, glossy white, black 
    Ink: Memento tuxedo black, Rubbernecker Stamps/Brass & Bliss reinker sets: #6, #8, #9 & #11
    Accessories:  Rubbernecker Stamps/Brass & Bliss:  Thanks w/ Shadow, Rose Border dies, baby wipes


    You might also like:


  • Feeling Mushy


    A fun card with a mushroom & frog friend in front of a cute gnome cottage, Use for a birthday, just a note or feel better occasion. Easy to make & choose your own colors to switch it up. 

    A big congrats to Laura, the newest Featured Stamper (FS875)! She has a wonderful gallery & I chose THIS card to case. I liked the layout, so I kept that, but I used different images, different colors & different dies.

    After coloring & cutting out my little mushroom & frog friends, I colored the gnome cottage & did a little out of the box on the elements on top of the gnome cottage, then inserted a rust colored oval frame on top. The greeting was stamped along w/ some extra toadstools along the bottom. The mushroom & frog were popped up a bit on top.

    Here are the Copics I used for the Mushroom/Frog:

    The cottage was colored separately & here are the Copics I used for it:

    Thanks
    so much for stopping  by! 


    Supplies:

    Stamps: Rubbernecker Stamps:  Gnome Cottages, Feeling Mushy set
    Paper:  Staples 110# white, X-Press It, moss green, rust
    Ink:  Memento tuxedo black, cottage ivy (for row of toadstools at bottom)
    Accessories:  Rubbernecker Stamps: Rectangle Stitch, Stitched Ovals, Feeling Mushy set dies, Crossover II, Misti, Copic Markers


    You might also like:


  • Floral Smile

    A flowery, all occasion card for a friend or relative featuring beautiful dies & paper w/ a short tutorial showing how I did the partial die cut edge. 


    A big congrats to Diane, the newest Featured Stamper (FS856)! She has a really lovely gallery & after much browsing, I chose THIS card to case. I loved the fancy lower edge & layout, so I kept those, but I used different dies, colors & papers.

    For my card, I did something I don’t usually do..I picked the floral paper first & die cut it. I wanted to make sure it would stand out enough behind the top panel. Then I cut a smaller white panel & used an oval die to do a partial die cut edge.
    Here’s how I did that:

    I placed the large stitched oval where I wanted the edge to be (shown above).

    Then I placed the top plate over just the area I wanted to cut. (I’m using the Big Shot here so you can see it, above). The machine will only cut what the top plate covers.

    All cut & turned out perfectly! Now I have the curved edge I wanted.

    I then die cut the fancy oval & the envelope of flowers out of white & trimmed off what I wasn’t going to use. I placed the section of the fancy oval under the curved edge & the flowers/leave of the flower envelope I trimmed to fit on top. I cut some pieces of 2 different dusty pinks to place behind the 2 big flowers & 2 small buds. The greeting was stamped in black & heat embossed. I didn’t have the right color of gems, so I used a Copic marker (RV34) to color the clear stones. The greeting circles were popped up just a bit.

    Thanks
    so much for stopping by!


    Supplies:

    Stamps:  Rubbernecker Stamps: Petunia Blooms set (greeting)
    Paper:  Staples 110# white, lt pink, dusty pink, Rubbernecker Stamps: Welcome Spring paper pad
    Ink: Versaclair nocturne
    Accessories:  Rubbernecker Stamps :  Nested Stitched Rectangles, Letter Full of Flowers,  Petunia Blooms, Decorative Floral Circle, Stitched Circles, Stitched Ovals dies ,  Crossover II, embossing powder ,rhinestones


    You might also like: