• Tag Archives Splitcoast
  • SCS Challenge

  • Vellum Flowers

    Julie Warner - https://thewritestuff.justwritedesigns.com
    Weekly-Favorite
    A big congrats to Cary, the newest (and last FS for 2013) Featured Stamper! Such a wonderful gallery! I chose This card to case. I loved the white on color and the window opening, so I kept those but I changed the color, the images and made 3 openings thru the front instead of 1.

    For my CASE, I white embossed the bg onto kraft card stock trimmed to 5.25 x 4.0. I temporarily attached it to the front of my A2 card and die cut the solid flower 3 times thru the front. After lining up a piece of vanilla vellum, I white embossed the three flower images onto the vellum. I decided the white embossed kraft didn’t show up well around the cut outs, so I die cut a band of white and lined it up on top. It may be a bit hard to see, but the light shines thru the vellum on the cut outs thru the card so nicely. I added ribbon like Cary did and also a little greeting tag attached to the ribbon.

    Thanks so much for stopping by!

    Julie2 sig

    Supplies:

    Stamps: Our Daily Bread designs – Ornate Borders & Flowers, Ornate Frames Sentiments, Ornate Background
    Paper: Neenah white, kraft
    Ink: Colorbox frost white pigment, Colorbox toffee chalk ink
    Accessories:  ODBD Ornate Borders & Flowers dies,  ODBD Recipe & Tag dies, white embossing powder, ribbon, baker’s twine


  • Feel Better

    Julie Warner – https://thewritestuff.justwritedesigns.com
    Weekly-FavoriteCAS-Favorite


    For today’s Free For All (F4A201) and Mixabilities (MIX48) (Basic Shapes) Challenges, I used F4A170  (Repeat after Me) for my choice of Free For All Challenges and I think I’ve covered the basic shapes…squares in my grid bg, circles int he flower elements and triangle shapes in the corners bordering the greeting and also the shapes radiating from the flower centers.

    On a 4 x 5.25 piece of white card stock, I attached a strip of drywall mesh and masked the area on either side. After sponging several colors from a Kaleidacolor ink pad, I removed the mask and edged the panel with a black marker. I stamped the solid flower with same ink and stamped the detail flower with black before die cutting with the matching die. The greeting was also stamped and die cut. The larger die cut behind the greeting was stamped, die cut and with the die still in place, I sponged on some of the same ink. The vertical & horizontal strips were parts that were trimmed off and I edged them w/ black, embossed w/ the dot border and attached them on top. Some dots of black enamel were added on the flowers and greeting.

    Thanks so much for stopping by!

    Julie2 sig
    Supplies:

    Stamps: Our Daily Bread designs – Ornate Borders & Flowers, Ornate Frames Sentiments
    Paper: Neenah white
    Ink:  Memento Tuxedo black, Versafine onyx, Kaleidacolor Riviera
    Accessories:  ODBD Ornate Borders & Flowers dies, Copic markers, drywall mesh, Ranger black enamel, Cuttlebug embossing border folder (With Love set)

  • Christmas Candle & Into the Window mini tutorial

    Julie Warner – https://thewritestuff.justwritedesigns.com
    Weekly-Favorite
    A big Congrats to  Roberta, the newest Featured Stamper (FS359)! She has such a wonderful gallery! I chose THIS beautiful card to case. I kept the large oval and shaving cream background, but I used different image, different colors and made mine a Christmas card.

    On my card today, I’m using this really wonderful candle image. I just love it! I thought it would look really nice w/ an opening behind it and the stained glass stamped on top. Logically, the stained glass should show thru the glass of the Hurricane lamp, but y’all will have to overlook that one. It was getting late and that was a bit too much to do. Especially since I already did a special “into the window” treatment. It’s a lot likeout of the box” but it goes into the cut out instead of out of it. After stamping the image, I lightly penciled in the shape of the oval opening I wanted to die cut. Then I cut around the parts that I needed to have on top of the die to keep from cutting them off and I inserted the oval die as shown.
    Julie Warner – https://thewritestuff.justwritedesigns.com
    It’s just a rough cut around the candle now…I’ll trim it after I die cut the oval.
    Julie Warner – https://thewritestuff.justwritedesigns.com
    This is how it looks with the bottom of the die inserted under the bottom of the image. All ready to die cut now.
    Julie Warner – https://thewritestuff.justwritedesigns.com
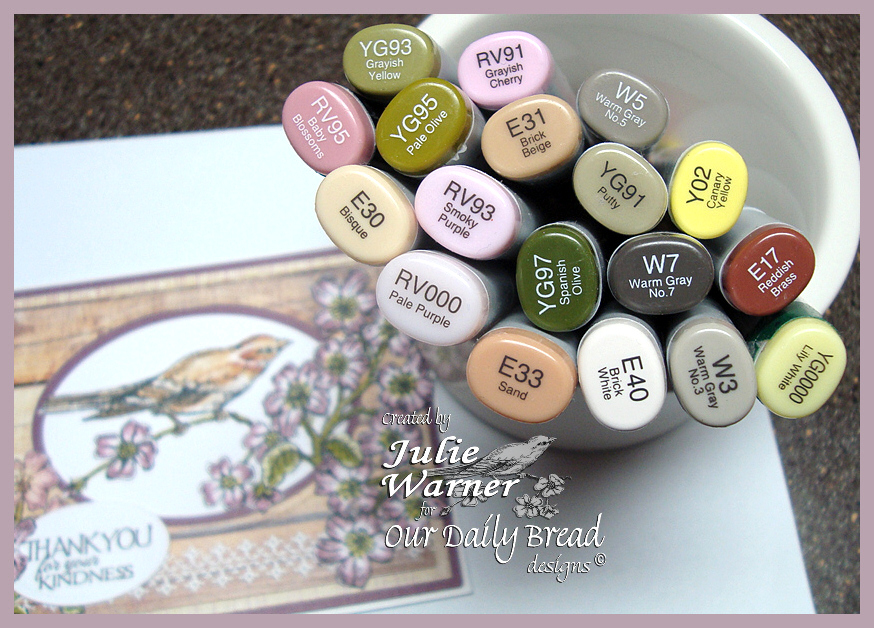
    Die cutting and embossing all finished! Now I’ll trim it and color the image. The stained glass image was gold embossed on a piece of dk purple shaving cream background I made ages ago. I liked the contrast of the dk purple behind the candle. The greeting was stamped below and my finished card is 4.25 x 5.50. These are the Copics I used to color it.
    Julie Warner – https://thewritestuff.justwritedesigns.com
    Congrats again, Roberta! Enjoy your week and Merry Christmas to all! Thanks so much for stopping by!
    Julie2 sig
    Supplies:

    Stamps: DRS Designs  –Holly Hurricane, Stained Glass Oval, Christmas Words Edger
    Ink:  Memento tuxedo black, Tsukineko ultimate metallic gold pigment
    Paper: Neenah white, dk purple
    Accessories:  Copic markers, Spellbinders petite oval die, gold embossing powder, shaving cream & reinkers (for shaving cream background)