• Category Archives Brass & Bliss
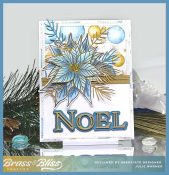
  • Stamp Company » Brass & Bliss
  • Gnome Love


    A sweet & bright Valentine card featuring a pair of sweet on each other gnomes. Quick to make since the XOXO is a cover die & all you have to do is add colored paper behind it.

    A big congrats to Polly, the newest Featured Stamper (FS887)! She has a lovely gallery & I chose THIS card to case. I kept most of the layout w/ the circle element on top, but I used different images, dies & colors and used a cover die instead of the fun fold.

    The cute gnome couple image was colored & die cut w/ the coordinating dies. I die cut the circle stitch layer (from the cover die) out of turquoise, trimmed it from the rest of the die cut, & attached it on top of a white circle. The gnomes have foam attached to the back to pop them up.  After die cutting the XOXO cover out of white, I added a piece of bright red behind it then put back the centers of the O’s before attaching a turquoise layer behind it. When I was sure I wouldn’t need to touch it, I added dimensional glaze to the heart to make it shiny.

    Here are the Copics I used:

    Thanks
    so much for stopping by!


    Supplies:

    Stamps: Brass & Bliss:  I Love You Gnomes set
     Paper:  Staples 110# white, red, turquoise
    Ink: Memento tuxedo black
    Accessories:  Rubbernecker Stamps/Brass & Bliss:  I Love You Gnomes set, XOXO Cover, Circle Stitch Cover, Circle Stitch dies,  Copic Markers, Misti


    You might also like:


  • Hello Panda


    A fun panda in a pocket card backed w/ some pretty monochromatic paper & using some lovely scalloped frames. With the different frames, it looks like you worked really hard, but it’s really easy & not much coloring. 

    It’s my turn to host the Inspiration Challenge on Splitcoast (IC948) and we’re visiting Doodle & Stitch & their Pinterest Board where I found THIS cute picture.

    After stamping, lightly coloring & die cutting the panda & pocket, I die cut the white frame & the designer paper using two of the outside scallop frame dies. The grey frame was die cut w/ an inside scallop die. I really like how they fit & work together. I used a peach card stock for the pocket, but couldn’t find a larger piece for the narrow border under the monochromatic paper, so I used a Copic marker to color just the border that would show.

    The panda & the pocket were popped up just a bit since the edges go over the gray frame. Two hearts were die cut (but not stamped) out of the same paper & added on the pocket.
    Here are the Copics I used (sorry it’s blurry..the colors are C2, C3, R20 & R22).

    Thanks
    so much for stopping by!


    Supplies:

    Stamps: Brass & Bliss: Animals in Pockets set
     Paper:  Staples 110# white, grey, peach, dp Brass & Bliss (Floral Monochrome )
    Ink: Memento tuxedo black
    Accessories:  Rubbernecker Stamps/Brass & Bliss: Inside Scallop Frames, Outside Scallop Frames, Animals in Pockets dies,  Copic Markers


    You might also like:


  • Rose Border Thanks


    An easy to make Thank You card for someone special. The rose die cut border on top is beautiful over what ever color you want to use. The greeting is half die cut, half stamped, but you can stamp the entire wording, if you prefer.

    A big congrats to Giovana, the newest Featured Stamper (FS886)! She has a gorgeous gallery & after much window shopping, I chose THIS card to case. I kept the multicolor design, but where she used a stencil I made a stripe background on glossy paper using dye reinkers & a baby wipe. Her white space is the stencil, mine is the die cut on top. I also kept the “everything” part but made mine a thank you card & added more white space for the bottom of my card.

    My card was pretty easy to make. The baby wipe (tutorial HERE) bg had been in my stash for a while so I die cut the rose border, added some white cardboard under it for strength, then attached it to the stripe background. The lower section that was cut off from the border was added back on, but I shifted it just a tad down. The very lower edge was trimmed off about 1/2″ so I could add a narrow strip of the background at the bottom.

    The Thanks die cut was stacked for dimension & the rest of the greeting was stamped underneath it.

    Thanks so much for stopping by!


    Supplies:

    Stamps: Brass & Bliss: Freehand Frame set
     Paper:  Staples 110# white, glossy white, black 
    Ink: Memento tuxedo black, Rubbernecker Stamps/Brass & Bliss reinker sets: #6, #8, #9 & #11
    Accessories:  Rubbernecker Stamps/Brass & Bliss:  Thanks w/ Shadow, Rose Border dies, baby wipes


    You might also like: