This is Christmas card is as shiny as a bright new penny. It has so much shiny gold & sivler it’s almost blinding in real life. It will really catch your eye! Except for the stenc…
- Category Archives Embossing/Dry or Heat
-
-
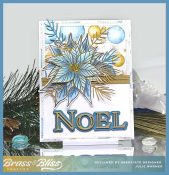 Am I Blue Poinsettia
X4! Today I have a blue poinsettia card with gold accents. The colors for the poinsettia were picked to coordinate with the lovely blue and gold paper I used on the top of the card. The p…
-
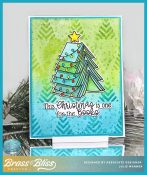 Christmas for the Books
This is a Christmas card for the reader in your family or group of friends. This set has several book themed images & greetings, perfect for the avid reader. The background has a little…